-Four photo albums (I feel like I lucked out finding these at Walmart for $5 each! They are sturdy and came in great solid colors- meaning they were ready for me to decorate. I also liked the fact that they were meant for 4X6 pictures, but the album itself is larger and square. They were just what I was looking for!)
-A package of silver gems (I found mine at Walmart in the craft aisle. I don't remember the exact price, but they were under $5.00. Possibly $2.99)
-A package of scrapbook letters (I got the hot pink glittery ones that I used from Target's scrap booking aisle for $.99! They were perfect!)
-A hot glue gun
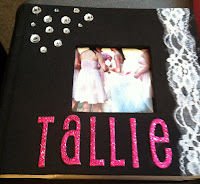
My plan for the albums was simple. I knew I wanted each to have their name, and I knew I wanted each to be "bedazzled." When I was ready to make them, I started by sorting through the letters and spelling out each girl's name. I wanted to make sure I had enough letters before I did any gluing. Once I saw that I wasn't going to have to make a last minute dash to the store for more letters, I started with the first album. I placed the letters evenly spaced below the picture slot on the album cover. Then, I took out my gems and played around with their placement. I arranged different sized gems in the left hand corner and liked the simplicity, but I still thought that something was missing. Light bulb! I quickly ran to my box of stuff used for the wedding and found leftover lace that we had used to wrap around mason jars. I thought that it would be the perfect touch, since lace was such an important aspect of my wedding. I wrapped lace around the right hand side of the cover, and knew I had finalized the album covers. It was time to glue!
Here are the photo albums after decorating:
Note: I had not printed any pictures for the albums yet, hence the lame picture that comes with the albums.
Another great thing about these albums was they came with a blank page (like a cover page) right when you open them. I used this page to write heartfelt thank yous to each of the girls.
After the albums were decorated, I went through all of my pictures and ordered the ones I wanted online through Costco's website. I really like their quality and prices, plus it's convenient to order online and pick up at my local Costco. Here are a few pictures showing the albums after I had filled them with photos:
I really had fun with this DIY project, and I adore how they turned out.
Thanks for reading!


It would have been great to create that Picture Album. It's so nice and lovely. I would like to see the design. Could we take a closer look to it?
ReplyDeleteI'm glad you think so! I don't think I have any other pictures of the albums since I have already given them away as bridesmaid's "thank you" gifts- but I can double check this weekend:) If you have any questions on what I did to make them though I would be happy to answer!
ReplyDelete